Friday, August 30, 2013

70's gym shorts... and altering patterns


I'm on a roll here this week with the blogging. I have a lot of ideas but not so much time to get them down! This one will be quick, though.

Starting with turning a regular pair of shorts into Lift & Separate, I've been on a bit of a derby shorts kick. I have made a couple of pairs of high-waisted Lift & Separate shorts from scratch (one of those ideas I have a post planned for, but not completed), and then I saw these 70's gym/roller-rink shorts that I wanted to try. This is a good tutorial for constructing the shorts, because it's slightly different from typical shorts construction- basically the seams are sewn in a different order so you can add the trim. However, it just starts with pattern pieces in hand, so I thought it might be useful to show how to get those shapes that fit together just right.

When I have a piece of clothing I love, I often will just trace the pieces and add a seam allowance in order to recreate it. So that would be one good place to start, if you have a pair of derbyskinz that fit you just right. In this case, however, I'm going to show you how to start with a pattern. I'm using a basic Kwik Sew Yoga Pants pattern (3443) that I picked up at my local Ben Franklin.

Start out by reading the pattern and determining your size. This pattern seems to run pretty big- I wear a medium in nearly everything but I ended up using the XS waistband on this pair of shorts. When I am making changes to a pattern, I always trace it, in case it doesn't work and I need to use the pattern again. In order to do this, I darken the line I want to trace with a soft lead pencil, then lay blank newsprint (I get roll ends from the local paper) over top and then just trace it. Every once in a while I lift up the newsprint to make sure I'm on the right line. You can see in the photo below that the first time I traced this pattern, I made a medium- but I had to give those away!


To turn pants into shorts, you just have to decide how long you want your inseam to be- that's the seam that runs from your lady parts to your inside ankle. Or for shorts, not so far. I measured down 1.5" from the corner that is the crotch seam. I figured that with a 1/4" seam allowance and a 3/4" trim, that would give me a 2" inseam. And truthfully, that might be a little long for derby shorts, they might bunch or roll a little in there when I wear them. When I do this again, I'll probably try 1". 

Once your pattern is traced, you really need to label it really, really well. Because sometimes you might put a project down for a few days or weeks and then come back to it and HAVE NO IDEA which piece is which and how they go together. Ask me how I know. You should always write on it:
  • originial pattern & number
  • pattern piece (front, back, waistband, etc.)
  • size
  • cut instructions as listed on the original
  • grain of fabric and stretch if indicated
  • any pattern markings you need to line pieces up


You can see here I marked the corners, but not the shape of the leg opening, because I knew I wanted to curve it like in that first tutorial. So for this part, I just looked at the pieces in the tutorial and winged it.


I think if I were to do it again I might add a little less on the bottom and cut that corner off a little more.

I traced the front piece exactly from the pattern, although I later made it drop a little more in the front after I tried it on. I did this by just making the front center 1" lower than it originally was, going from that point to the side seam with a straight cut. I should really fix my pattern piece to reflect that change now! And then I traced the wide waistband, but reduced it to be 9" tall, leaving a 4.5" waistband. I didn't want too much extra fabric, it just makes me sweat. I then assembled the shorts according to the directions in that original tutorial. I didn't take any photos of this process, but I think the tutorial does a good job there.

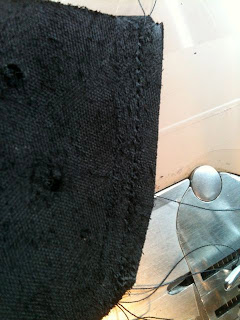
And here they are! The photos aren't great, but you get the idea. I actually think I need to make the waistband even a little smaller around- I like my high waist shorts to act like Spanx! In these pictures, the waistband is almost fully folded down over the shorts.


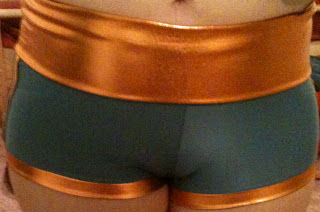
And one final note- sewing spandex often results in skipped stitches. Make sure you are using a new, ball point needle, preferably one labeled especially or elastic fabric. You also may need to ever so slightly stretch the fabric when sewing to prevent skips, or you can lay tissue paper over the top and then tear it out. And use a narrow zig zag stitch or a stretch stitch. But you knew that.


Saturday, August 24, 2013

Skate Toe Covers/Caps - Pattern & Tutorial

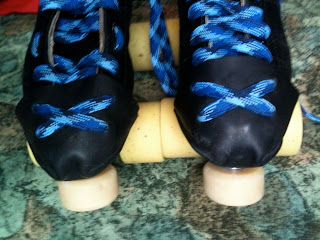
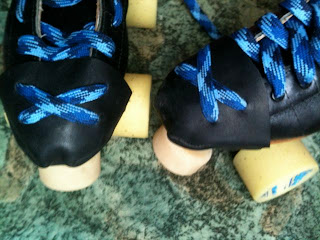
I already posted about how to make the simple, strap-style toe guards. Those are great, and easy to make even if you're not super crafty. However, once you use them for a while you notice that they tend to slip to the side, and/or protect only the front of your skate boot. When I upgraded my boots from Riedell Darts to 495s (and got the right size- which matters a lot), I realized I wanted full toe cap coverage to protect my investment.


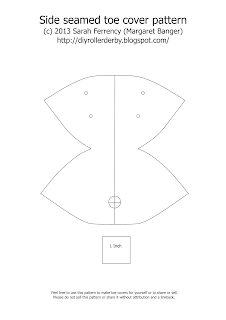
Other people have posted about making toe guards, but I didn't find any really good patterns. I started looking at my teammates' toe covers, and ended up just wrapping paper around my skate and adjusting it until it seemed right. And now I've turned it into a pattern to share.

I'm not sure this pattern will fit universally, so I would recommend sewing up a sample in scrap material and trying it on for size, then adjusting as necessary, before cutting into your good material. The first pair I made I just used some scraps of sparkle vinyl. I used those for a few months and they held up remarkably well, skating on a very smooth inside surface. I ended up tearing a small hole in one when I fell skating on pavement, so I decided to make some out of leather.


I looked at my local thrift store for a coat or a purse to repurpose, but I didn't have much luck, so then I looked online to buy a piece of leather (I live on an island in Alaska, remember?). Most leather supply companies seemed to sell whole or half hides (which are huge) or small scraps. But then I found Brettunsvillage.com, where I was able to get a remnant! It cost $30, they shipped it USPS flat rate for free, and although I don't remember exactly how big it is (12 sq feet?) I think I could make 15 pairs of toe guards out of it or more. Not bad for the cost of just one pair, huh? Figuring out what thickness to buy was tricky, and I also don't remember what I got, although I think it was around 3 oz and I know it was "regular" temper. It's pretty perfect, possibly slightly too thick. So here we go!


Toe Cover Pattern & Photo Tutorial

Skills Needed: Basic sewing

Time Required: About half an hour

Tools: Sturdy sewing machine (mine is vintage- you might be able to do it by hand, but I'm not sure I'd bother), office scissors (optional), sharp scissors, marking tool such as chalk/pencil/white crayon/white colored pencil/white soap sliver, leather sewing machine needles, X-Acto knife, leather punch (optional), printer, ruler, crescent wrench to install

Materials: About 1 sq ft leather, thread, contact cement (optional)

Note: It helps to read the instructions through before beginning.

1. Print the pattern below, being sure to scale it at 100%. Check to make sure the square is exactly one inch.


2. Cut out the pattern on the lines using your office scissors. Never cut paper with your sharp/fabric scissors!
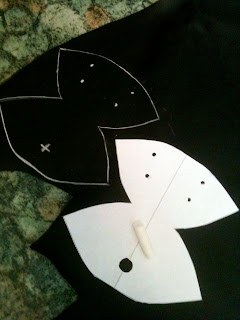
3. Place your pattern on your leather as close to an edge as possible, leaving room for another piece, and trace it using the marking tool of your choice. Poke through the lace holes and mark those, and also mark the large circle or + (more on this later). Repeat for the second cover.


4. Cut out the pieces on the tracing line. You could do this with your sharp scissors or your knife.


5. Punch the lace holes with your leather punch, or poke through them with your knife tip and twist the knife to make the hole large enough for your lace. 


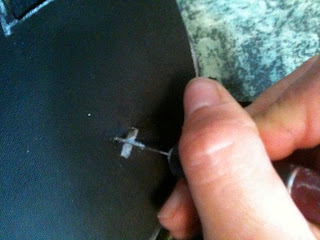
6. For the toe stop hole, you can either use your knife to cut the + sign (this is what I do) or you can cut the circle. If you like your stops really close to your boot, I recommend cutting out the circle, because sometimes the extra material makes it hard to screw them down all the way. Err on the side of small here. You can always make it bigger, but if you make it too big, it will wiggle.


7. Brush a 1/8"-ish wide swath of contact cement on the right side side of one edge of one of the pieces. Allow to dry, then carefully match up the top & bottom sections of the edge, sticking them together. Alternately, follow the instructions on your contact cement, or skip this entirely (sometimes it can gum up your sewing machine, so if this happens, just skip it).


8. Using a long straight stitch and a leather needle, sew 1/8" from the edge, being sure to backstitch at the beginning and end of the seam. Note: In the photos I'm sewing 1/4" from the edge. You really want 1/8".


9. Repeat with the other side and the other piece. 


10. Turn inside out and pull on the seams to make sure they are strong. Ta-da! 


Seriously, it just took me less than half an hour to put these together, and that was while taking pictures, too!


To install, unlace your skates and remove the toe stops. Take the washer and nut off the toe stop, put the screw through the big hole or + in your cover, and replace the nut and washer. Reinstall your toe stop, being sure to use a real wrench to tighten the nut down really well, because it's a total pain to tighten the nuts after the cover is fully installed. Remember the order is always boot, washer, nut, cover, stop. Lace through the holes however it makes the most sense for your lacing style- I went across from underneath in the first boot holes, out through the cover's first holes, crossed and back down through the cover's top holes, down into the boot's second set of holes, and then laced as usual. I also skip a hole in a spot that rubs, if you're wondering why it looks weird.

If you want to get really fancy, you could paint or applique designs on the top before sewing them together, or you could add grommets or eyelets to the lace holes, although I don't think that's really necessary.

Logo Logo Logo (and merch)

I can't believe I never posted this! We had a logo design contest for our league, and looky here, I won! Here is the winning design (credit goes to my Phil for the idea- those are a gaff hook and a halibut hook, both references to commercial fishing):

 And then this one is the final version, with the new team colors. Orange for the sunset, since we're the westernmost Southeast Alaska community and the sun sets over the ocean here. The blue is for the ocean and the near-constant rain.


We took the advice presented in this derbylife article on branding derby as we were finalizing the logo.We can pull out just the "Slayers" or just the skull or whatever to print on smaller items, too. I want to do nail decals!

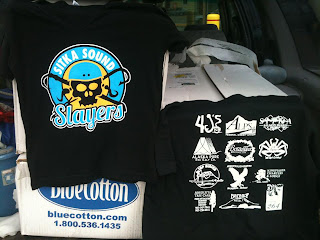
I used Inkscape for the design- my only word of advice is to start with a CMYK file. Otherwise we haven't had any trouble with getting merch made. So far we had T-shirts, tattoos, and stickers. The blue is causing a few problems- it's different on everything we have printed. The stickers, which were CMYK screened, are probably the best, although they look royal in this photo, they're actually very close to just the right slate blue. 


We got the stickers from Stickerrobot.com, and they're fantastic. Really high quality outdoor vinyl; I can't recommend them enough. Tattoos are just cheap, but they work fine, from tattoosales.com. And the shirts from bluecotton.com. They had great service and did an excellent print job, although their selection of garments was somewhat limited. We haven't been able to find slim, shaped ladies' style tees in adult woman sizes, just juniors. It seems that women's sized shirts are boxy and wide instead of slim and shaped. What shirt do you use?

Quickie- Sparkle Vinyl Skate Bag

A while back in my "Simple Toe Guards" post, I ended with a teaser about my skate bag... and then never posted about it. A commenter kindly asked, so here's a quickie for you...

I was looking for a skate bag on eBay right when I started derby, because the two tote bags I was using were a little unwieldy for the 1/4 mile walk to practice. I saw this amazing bag, a Schwinn Stingray messenger bag, that looked perfect. Even better, it had a cool "S" on it, which is my first initial, the initial of my first blush derby name (Sarah Shreddington), and the initial for my team, the Sitka Sound Slayers. And best of all, it was red sparkle vinyl. Unfortunately, that one went for more money than I was willing to pay, but I still had red sparkle vinyl on my mind. So, I decided to sew one up for myself.

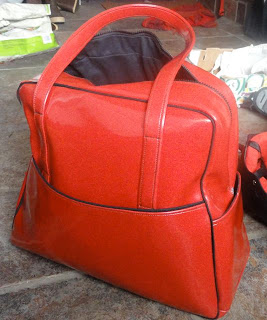
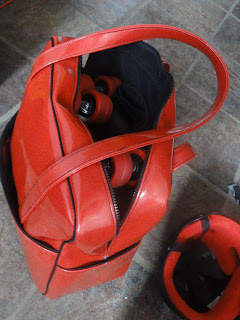
I'm not sure how I decided to make the Amy Butler Weekender Bag. I think I saw someone else's red sparkle vinyl version of it. There are pattern reviews all over the Internet about this bag, and the overall sentiment is that it's a total pain in the neck, but also worth it. I'm a pretty competent seamstress, so I decided to go for it. And it was a total pain in the neck. I had to make some modifications to compensate for the thickness of the vinyl (fewer layers of interfacing), I used premade piping, and I lengthened the straps to ensure I could carry it over my shoulder. I broke a zillion needles, heavy duty and leather varieties. I sewed much of it with heavy duty thread, which was a mistake because my machine hated it. One of the strap attachments came off right away as a result. It worked much better when I switched to regular thread. I used a sturdy cotton twill for the lining, but somehow despite following all instructions the lining was too big for the bag. I need to remove it and fix it, but I just haven't gotten around to it. I did add some interior pockets to the lining, which is good for tools/mouthguard but bad for catching skate wheels. You can see a little in the picture below how the poorly attached/too big lining is pulling on the top of the bag.


 If I were to make it again, I'd use regular thread, be more careful in making sure the lining fit before I stitched it in, and do that part more carefully. I'd also sew the straps up and down in the strap topstitching instead of just having the horizontal attachment points, which just don't seem like they will last all that long. I intended to make the false bottom and add metal feet, but never got around to it.

I had saved my eBay search for the Schwinn stingray messenger bag, and shortly after I finished making my bag, another Schwinn bag came up for auction. I used Gixen to snipe bid on it (the only way I have ever succeeded in getting anything on eBay, by the way) and got it- for close to half what the first one went for! So now I have TWO red sparkle vinyl skate bags! I used the Schwinn bag for a while but switched back to the Weekender despite the lining issues. The Schwinn bag holds everything, including my helmet, so that's cool, but the messenger bag style hurts my back to carry it for any length of time. My Weekender bag holds my skates and pads and little things, and then I clip my helmet to the straps. For a while I put everything but my skates in the bag and used a skate leash, but it was awkward to walk with the skates on the leash.


I've been using it for about 6 months now, and it's working really well and holding up great, even with the one failed strap attachment. Unfortunately, since I made the bag our team voted on orange and blue for our colors! I love the colors- orange for the sunset since we're the westernmost town in Southeast Alaska, and slate blue for the water and the constant rainy sky. I liked red and black for the Tlingit connection, but it's true that they are a little overdone in derby. The good news though, is that I think the Schwinn bag comes in orange... so I have another eBay search saved!

Oh yeah- I almost forgot to tell you that vinyl is the worst possible material I could have selected for a skate bag, because it doesn't breathe. Right after I finished it, we had a skate clinic and the woman leading it talked about how people's bearings sometimes rust just from being left in a bag with sweaty gear (and I'm guessing that's not in a rainforest or even necessarily a vinyl bag). So I am diligent about removing my gear from the bag and letting it sir dry after every practice. It keeps the stink down, too.

So there's my quick post. I have a couple more not quite ready to go... full toe covers and lift & separate shorts from scratch. So if you want to hear about those, shoot me a comment and maybe I'll get off my duff and do them.

Also, do you think I should have stuck with Sarah Shreddington? (my given name is Sarah)